Pages

Saturday, August 17, 2013

Classroom Reveal: Teacher Digs 2013


Hello friends, I've linked up with Blog Hoppin' for Teacher Week'13 Click below to hop on over and go on a marathon of classroom tours.

This is my welcome door. I'm not super crafty so I am pretty proud of this.

Whole Brain Teaching Posters (I made these) and new chevron alphabet can be found here


This is my view from the door. I am very excited about switching to tables this  year. Right now I have 25 students. My iPad cart is under the problem solving strategies by the window. Headed to school tomorrow to get those set up. I can't wait to use them to go deeper this year!


View from the back of the room looking toward the front. Smart Board, clip chart, left over pieces of Saxon math board that I still use. New easel that I am stoked to use for math conversations, and an actual place to create anchor charts.

My clip chart to go with my owl theme.

From opposite corner of the room. Aren't my chair pockets beautiful! Check out my post that give directions on how to make them here.

The colored bucket came from Big Lots and will hold their O.W.L Binders. I can fit 4- 1 inch binders in each bucket. 5 will squeeze in there if I need to.

Library is not complete just yet. I still have quite a few books still at home, not quite done sorting! Seems to be never-ending. The READ poster is Carson Dellosa. Under that are the very cool author posters from Amanda Madden at Teaching Maddeness, but you have to follow Owl-way Be Inspired Blog to find them. These posters give actual photos of the author and a little info about each one. Think book jacket. Pretty cool!

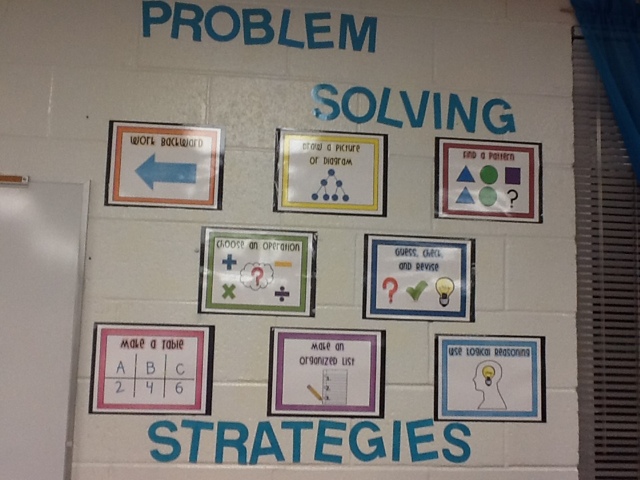
Above you will see my problem solving strategies posters. You can find these here. Our district is working hard to make sure we are teaching common strategies.

This is my writing center bulletin board. The awesome pencil can be found here for free! The I Can Write A... examples is from TpT here.

I LOVE these figurative language posters. I am really hoping to get a lot of "bang for my buck" when I teach word choice this year. There is a lot of power in preparing students with all of these ways to "show not tell'. You can get these here.
These six trait posters above,  you can find here

This is the back of my room with my student computers. My beautiful curtain maid by yours truly. This hides all my wonderful accumulation of "teacher stuff". Really loving the calming
effect it has on the room.
Now I can't wait to see your digs. 

Tuesday, August 13, 2013

Monday Made-it:Chair Back Pockets

Happy Tuesday everyone! I was so busy yesterday I couldn't get this post up in time for "Monday". We have Meet the Teacher Night on Wednesday so the room has to be done. So I worked ALL day in one form or another. The day, was spent on my Monday Made-It: Chair Back Pockets (not really sure what their official name is, LOL) The evening, into the wee hours of the morning, were spent finishing up my classroom. You all I was there until 2 AM! That's right in the morning! I was then up at 7 to take my own girls to the zoo for our last summer day together.

Now for the Monday Made-It: Make sure you hop on over to 4th Grade Frolics to check out the other wonderful-ness going on there.
Hop on over and check it out
Now to show off these bad boys! Aren't they pretty!!!


As you know from previous posts, I am converting from desks to tables this year. I am very excited about the transition. To think no more lost papers, or playing with who-know's-what in the "black hole" that becomes most third graders' desks. Can I get an "amen". I was kind of nervous about the switch at first and wasn't sure I wanted to commit. But after having a conversation with some other teachers I returned to my room and bumped into a desk and half of its contents spilled out onto the floor. I had a light bulb moment and thought "won't have to deal with that anymore, sign me up"

Well converting to desks has its own set of challenges. Mainly--where to put all the stuff that used to go in the pit of the desk????

Well when you have a big sewing project, who do you call? Well, for me it is the wonderful ladies shown below. Back row is my husband's great Aunt Mary, next is my mother-in-law Nancy, front left is my husband's Aunt Darla, and next is his Great Aunt Jewel. Missing from the photo is my own mother who helped me select the proper fabric. I hope I can grow up to be as classy as these ladies still are! I love them very much.

Now people, I haven't sewn since...8 years old and 4-H, seven score and 40 years ago! There was no way I was going to take this on by myself. So I called up Aunt Jewel and these other ladies and they helped me make it happen. Mrs. Young's Sweat Shop in full operation!! We had a full on assembly line, with people on several machines, cutting, ironing, talking, laughing and so on. 

Now for the Details:
I purchased pretty heavy weight fabric. I wanted these puppies to last. I guess you get what you paid for. I had a 40% off coupon (JoAnn's) and then a 20% off on top of that for my birthday and the total was still $100. I about fainted. The fabric is heavy like denim. It was called "bottom weight", but I have no idea what that means. You want the fabric to make it through the wear and tear of those little hands, so I'm hoping it is worth the extra expense. I also purchased the widest fabric they had. This helps you make more with each cut. One color was 54" wide and the other was 60". I purchased 13 yards and it made 31 with left over fabric. So you probably could purchase less and it would be make plenty.

The dimensions were 38" long and 15" inches wide with a double 1" seam on each side. The double seam is important. This way you are really reinforcing the sides and they won't rip out. You would have to adjust your width according to your chair. My advice bring home a chair and test them out as you go. (I'm holding onto the chairs I have now for dear life)

Aunt Jewel has a serger so we used that to bind the edges. If you don't have a serger then you will have to fold the length edges over twice to make a finished edge. Fold the top edges over too. One needs to fold toward you and the other away from you. (sorry I promise I took lots of pictures, but the files are damaged, go figure).

After that fold the top portion down 7.5" this is for the pocket that will hang over the top of the chair. Fold the bottom portion up the other direction to meet this seam, creating your back pocket. See first picture to get the idea. I intend to only put library books, and their math and reading journals in here.

The finished stack! I was so proud!
Check back soon! The next post will be my classroom reveal. Meet the teacher is tomorrow night!

Wednesday, August 7, 2013

What's Your Schedule: BTS Linky Party

Good Morning I've joined up with Simply 2nd Resources in a Back To School Linky Party. We are sharing our schedules for this year and ideas for what makes our schedule work. As we all know there aren't enough minutes in the day so we have to really make the most of each of them. Grab the button and link up!
Click here to view Linky list
I teach in a building that is only 3-4th grade. We currently have 6 sections of each. But, we've had as many as 7. I will have 25 students (so far) residency night is Wednesday and Thursday so there could be some roster changes before then. I hope not too many because I wrote names on stuff last night! I could help it, all those supplies...just staring at me...begging me to put names on them. The simple pleasures of Back To School.

This is my schedule for this upcoming year. (Sorry for the iPad screen shot, still learning how to upload PDF to blog, first attempt was too large)
As you can see I am blessed to have 60 minutes of plan every day even more importantly at the SAME time every day. Our RtI will be a building wide focus. Last year it was fluency and students were grouped according to data and sent to other rooms for that 20 min. Organized chaos at its best. This year we will decide as a building based on our data from testing the year before or a focus we choose. This won't start until October.

I have 100 min. of ELA (reading, writing, spelling) time daily. I teach from a basal (Treasures) with a great mix of whole group instruction, mini lesson, and guided reading groups.

We teach one quarter of science and then one quarter of social studies. This time is fluid so if my ELA time runs over it often spills over into this time, so I work hard to make sure that I am teaching across the areas as often as possible.

Math warm up (25 min.) consists of fact fluency and spiral review. I have taught Saxon math before and loved the spiraling so that nothing is left behind. We have since been writing and rewriting our own curriculum to match Common Core so we teach more of a unit approach. This has meant a very purposeful look at how I spiral the review so nothing gets left behind. For new math lessons and investigations we have 70 minutes. I have taught math mainly whole group, but am very interested in teaching it in small groups. Stephanie over at Third Grade Thoughts has a great series on math rotations that I am just itching to try. 

After that the day is really just a downhill slide with recess leading right up to dismissal. 

I would love to hear about your schedule. 

Monday, August 5, 2013

Monday Made-It:Dyed Clothes Pins for Clip Chart

This is my first link up, how exciting! Yes I know it is Tuesday, but hey I'm going to pull the newbie card for as long as I can.
Hop on over and check out the other wonderful projects

As you know I have totally committed to a new classroom theme. OWLs. This means my clip chart (and just about everything else) needed to be updated. I stumbled onto the clip chart scene two years ago and it has simplified my classroom management system. I am a true believer. I am sure most of you know of or use this system already. But if you haven't then here is the run down. All students begin their day in the green "ready to learn" section. As they make good choices they are asked to clip up to the next section on the chart. Students progress from green, to blue, purple and finally pink. If they make poor choices then they are asked to clip down yellow, orange, red. They can move up and down the chart many times throughout the day. For a more detailed explanation visit New Management for a free ebook that lays it all out.

For my students this has been a great motivator. They love to get to pink or " the top of the chart". When this happens they get a jewel to place on their clothes pin. After 5 jewels they upgrade to a different colored clip and earn an extra recess coupon. Our grade level is split into two teams, so I can easily send them out to the other team's recess. We also record the color that each student ends the day on in their student planners. I train parents to look for this each night. If a student ends the day on yellow, orange, or red then there are consequences involved. Usually this means loss of minutes of recess, but it could mean a think sheet, visit with the principal, or phone call home. At the end of the quarter we track how many days we were on each color and create a graph using Create a Graph. This website is very user friendly and kids like to be able to personalize it. We then use this data at parent teacher conferences and later student led conferences. It really puts the data in perspective and opens the door to some great conversations.

Here is a photo of my clip chart complete with my OWL themed titles.
Pink: Pride of the Perch
Purple: Behavior to HOOT about
Blue: Taking off: Leaving the Nest
Green: Perched to Learn
Yellow: Remember to Make Wise Choices
Orange: STOP and think wisely
Red: Confined to the nest (teacher's choice)
Now for the fun part. My students all start with a green colored clip. After they make it to pink 5 times they get to trade in their green clip for an red clip. They keep upgrading their clip until I run out of colors (green, red, orange, yellow, blue, and purple). This usually only happens with about 1-2 students a year. When this happens I have larger white plastic clothes pins that I spray paint GOLD and then they just bedazzle it with their jewels for the rest of the year. This is a BIG DEAL and the kids are so proud when it happens.

The first year we just colored our clothes pins with crayon, but they weren't very bright. Then I stumbled onto some directions on how to dye wood. That was when these beauties were born.
Wood Dyed with RIT Dye
Aren't the colors so vibrant, and it is so easy! I buy the cheap clothes pins from Dollar General, fill a sauce pan with water and add 1/4 cup liquid dye to the water. I heat the water to just boiling then simmer the clothes pins (I do 50 clothes pins at a time) for about 15 min. I do add a little salt (couple handfuls) to the water. I only do this because we used to dye class shirts and it made the dye set better, not really sure if it does anything in this process just made me feel better to add it.
 I use the liquid just because it is easier to manage and store. I am sure the powder would work the same; however, it would be harder to measure and store for longer periods of time. The liquid is a bit more expensive but it will last you for many years to come.

Here is what they look like in the pan
Let them dry for about 24 hours before putting them in some kind of bag. I learned the hard way and my beautiful pins got a little moldy because they weren't dry. Here are some more tips on dying wood from RIT. If you are like me now your thinking what else could I dye. The possibilities are endless.

Back 2 School 13-14

School starts in 14 days! Wow! where did summer go? I'm sure most of us repeat this phrase every first week of August.

When summer arrives, I spend the first two weeks adjusting to summer, sleeping in, staying up late, and doing nothing related to school. Then I spent several weeks in June preparing for vacation. June was over and July arrived, for my family that month is packed with events...4th of July, two birthdays, our anniversary, VBS, and two weeks of daily swim lessons (whew, I'm tired just revisiting the last month). With July gone in a blink we arrive at August. dah, dah, dunnn!

This was the first year in many that our building was used for summer school. We are used to being the first building cleaned so we are back into our rooms early. I was expecting a very late start, but thanks to some pushing from our wonderful principal we got back pretty much right on time. I walked into this...
Stacked to the ceiling!

Random stuff everywhere
So I really took these a couple hours into working in my room (still new at this blog thing). I absolutely despise the packing and unpacking phase. At the end of the year, I always come to the breaking point where I can see summer only a couple piles away and I start stuffing stuff in every corner possible. Anybody else feel me? I literally looked for my hot glue gun for about an hour before I found it where I thought I had put it only it was hidden with the other random things in that drawer. 

Then you return after summer really just wanting to get started and you have to UNpack! It can really take the wind out of my sails. For me the biggest bummer is my desk it too wide to fit through my classroom door so I have to box up my desk every year. You would think that would mean that I would have a really organized and purged desk, but not the case. 

I decided to change my theme this year. I had really only dabbled in a theme before, buying the cute "theme" of the season about every two years and going from there. My room had a sprinkling of frogs, and lots of other random "teachery" things. But people, you are a bad influence!!! I have spent the last two summers blog hopping and you'all have some cuteness going on!

So I jumped on board, fully invested. This year and for many future years (redoing and committing to a theme is expensive) I will be adding to an owl theme. They are so cute, I was totally in love. They have even spilled over into my home with owls in my kitchen. 

Here is a peek at the new additions.

These curtains are blue and aqua chevron fabric. Although I had to have the pattern run vertical (kinda of a bummer) because of the length I needed and the price of the fabric (always frugal). I love the way they hide my stuff! I have smaller shelves that run on the opposite wall and now that this is all hidden I think I want to make curtains for those shelves too. I used the ceiling clips and dowel rods to hang the curtains.

I sewed curtains to hide the shelf full of "important teacher stuff". People I haven't sewed since I was a 4-Her so I was very excited about how they turned out. 

New alphabet and WBT rules. Click on picture to take you to the link for the very cute rainbow chevron alphabet
 I hadn't had a new alphabet in 14 years!!!! Yes, I still had the functional, but ugly animal cursive alphabet that I bought at a teacher store my very first year of teaching. So I hopped on TpT and got this very cute chevron alphabet from The Bender Bunch. It comes in two sizes. The WBT teaching rules pictured above are my first digital creation.

6 Trait writing posters with Owls of course
These were the perfect addition to the owl theme. They also come from TpT click on the link above to check them out.
Finally, I went in to work one day with a long list of things to accomplish but instead worked on this project. Probably not the best use of my 2 hours, but I think it turned out super cute. 
New Door Display
My inspiration came from a pin on Pinterest (of course, where all ideas begin). Click here to link to the original pin. 
Well I hope everyone is getting along with their prep work. Ready or not the kids will arrive, for me on August 20th!